
Wednesday, October 31, 2012
Happy Halloween everyone! Today I have a Halloween project for you to print out and make with a few papers and other supplies! The digital papers were created with Clooney & Me GHOULIES & GHOSTIES which will be available again tomorrow (November 1) at a brand new store called Bella Zingaro! I have joined their Creative Team, along with a few of my friends from prior forums and stores! Be sure to check out the Grand Opening on November 1 at Bella Zingaro Studio (the name means "beautiful gypsy" ... and I think it is going to be a "good place for me" - just a store, no forum!)

3.
Clip paper to the shapes - treat them just like tiny layouts. You may discover that you will need to rotate
your canvas while you are working!


Directions for making digital paper parts:
1. Open a 12 x 12
canvas with a transparent background
2. Use the rectangle
tool to create two rectangles which measure 6.75 wide x 4.75 tall. Then create a rectangle which is 2.75 wide x
6.75 tall. I created one more rectangle,
this time with rounded corners to be the gift tag 2.75 wide x 1.5 tall. You can adjust your measurements on the
digital template but these worked best for my project (I've been making and
teaching paper crafts locally for about 10 years now, and I always try to
design so that I can efficiently use my paper supplies. I wanted this container
to use less that two sheets of 8 1/2 x 11" cardstock! You want to keep that in mind for the print
outs you are going to have to make as well.)
Example 1


3. After my canvas
was completed, I clipped out all the parts and saved as separate *.png files. I was then able to insert them into word
documents for easy printing. I made two
documents. If I print out #1 twice, and
#2 once I have enough digital paper to make two containers! (I always like to use all the space on my paper if possible.)
Print Outs

Now that you have your printouts done, it is time to
assemble your paper and other supplies.
Here's my supply list
Cardstock - Bazzill Jubilee 8 1/2 x 11 - 3 sheets - it's
make two containers
Ribbon - I just happened to have some purple ribbon with "trick or treat" printed on it. How cool is that?
Velcro tabs
Snack size zipper bag and candy to fill the bag (I put candy corn in mine!)
Tools I used: Paper trimmer, Scor-pal, Cropadile, scissors, stapler & staples
Ribbon - I just happened to have some purple ribbon with "trick or treat" printed on it. How cool is that?
Velcro tabs
Snack size zipper bag and candy to fill the bag (I put candy corn in mine!)
Tools I used: Paper trimmer, Scor-pal, Cropadile, scissors, stapler & staples
Directions:
1. Cut purple cardstock to 7 x 11". Repeat if you are making two containers!
2. Score at 5" and 6" for the same 7" end. I did my scoring with a Scor-pal. You could also use a Martha Stewart Scoreboard, or a paper trimmer with a scoring blade. If you don't have any of these tools, gather up a sheet of craft foam, a ruler and a pen with no ink left. Mark 5" and 6" on opposite sides of your cardstock. Stack cardstock on the craft foam (you need a little spongy give to it) lay ruler on your marks and use the dried up pen to score the paper for folding a 5" and 6".
3. Trim printout 1, and adhere to front and back of purple
scored paper. Make sure the top of each
piece of the print out is by the 7" ends of the paper. Set aside til later.
4. Cut purple
cardstock 7 x 3. Trim out the Happy
Halloween piece from printout 2, center and adhere to cardstock. Score 1/2" from the edge without
printing. Adhere 1/2" strip to top of previous piece your made. The other
side will just fold over the front piece.
Put circle velcro pieces together and adhere to the flap and then to the
big piece as a closure.
5. Staple the zipper
bag into the container near the fold on the flap. Be sure to staple the side that doesn't have
the zipper, so that you can put candy into the bag (and take it out too)
without having to take the container apart.
Add your candy!
6. Cut out the gift tag from printout 2. Attach it to cardstock, and trim it . Punch hole in gift tag and in flap of
container and tie on the tag with ribbon!
Present your container to the cutest little goblin you know! Here's my Preview:

Clooney & Me - Kit Preview

Your FREEBIE download includes: Preview of kit, Clooney & Me TOU, *.png files for the parts to decorate, ps scraps (that's me) TOU. Please abide by both Jean's and poki's TOU - personal use only!
Download HERE
Hope you enjoy the project!
Sunday, October 28, 2012
And the fun continues
While the Evil genius is away the minions have played. The True North Scraps minions have taken over the TNS lab while the evil genius Dawna is away. We will be posting coupon codes with big savings for one kit each day until Dawna returns on the 4th of November before we are forced to tidy up the lab and pretend we've been good. Check out the TNS Facebook page or SNP news forum each day for the code.
But enough about the tricks - you're here for more treats, right? Well here they are. Each of the TNS minions has a little treat for you on their blogs. Make sure you visit each of us to bag all that loot.
Kirsty http://littlestscrapheap.blogspot.co.uk
Melissa http://m2digitaldesign.blogspot.com
Lynn http://homewith3blueeyedbabies.blogspot.co.uk
Kandi http://www.addictedtodigiscrap.blogspot.ca
poki http://pokisproject2.blogspot.com
Tricia http://triciagarrett.blogspot.com
Amy http://scrappinmemories78.blogspot.com/
Here'a what I have for you featuring AUTUMN'S RAINBOWS
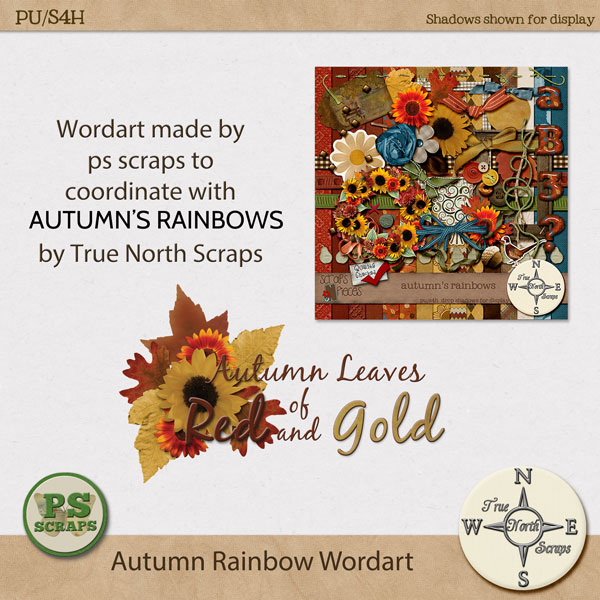
This is a jpg but the DL is a *.png file

You can download my freebie at MediaFire
We play the tricks and you get the treats! Hope you enjoy this wordart!
Wednesday, October 24, 2012
She's gone ... (on vacation)
Dawna of True North Scraps has gone on vacation and left us in charge ... won't she be surprised when she returns. We're putting one kit per day on sale ... today's feature is


Being a lover of all things AUTUMN, this kit was a favorite of mine from the first time I saw it. I made a new layout just for today.

What a perfect color match from my butterly collection! You know how fond I am of "catching" butterflies! You might also remember my sunsets ... this is the layout I did when I first saw AUTUMN'S RAINBOWS (we had just returned from our "end of summer" trip to Galveston)

And while participating in Scrap-N-Pieces SCRAP IT TO WIN IT contest I did this doublepage layout with AUTUMN'S RAINBOWS

See it does match my butterfly archive!
The "treat" for today is a coupon for 50% off AUTUMN'S RAINBOW, but you can only get it today! You can check at Scrap-N-Pieces Forum or go to True North Scraps FB page (she left us in charge of that too! Oh my ... but K must be sleeping in because I don't see the code there yet!)
Friday, October 19, 2012
Build a cluster frame
I want to begin by saying “I am not
an expert!” at PhotoShop Elements 10 – I just began working in the program in
January 2012, after years of working in several versions of Corel’s PaintShop
Pro (which I still occasionally use for certain things!) I have done followed
lots of other people’s tutorials, and I
have learned quite a lot this year … practice, practice, practice! (I work on
quite a few Creative Teams, so that gives me lots of opportunity to practice!)
Lynne of Baby Cakes Scraps suggested
this article when I asked for ideas for Monday Mojo projects. I was initially
“afraid” to tackle a “tutorial” since I really am just a beginner. I offer this
as a method that is working for me … there may be a better way to do it. If you
know one, please let me know (by PM to poki04 at Berry Sweet Scraps). I would
appreciate your input! After many years as a teacher, I must admit that I
probably “learned more every day than I taught!”
Now on to my cluster … I chose
elements from three of Baby Cakes Scraps autumn kits: AUTUMN BLISS, AUTUMN MASQUERADE, and SHADES OF AUTUMN, all available at Berry Sweet
Scraps. Be sure to stop by Baby Cakes Scrap store and check out these
beautiful kits, as well as others from Baby Cakes Scraps! Here is a legend of
the elements I used in the cluster.

I actually built the cluster
completely , and then went back and wrote the tutorial. I hid layers so that I
could show you in screen shots how I built the cluster! I used the wonderful
new SNIPPING TOOL in Windows 7 to grab the screen shots for this article! I
love it!!! (It’s great for grabbing photos that my niece posts on Facebook
too!)
1. First I built a circle frame,
using a custom shape “ring.” I started with a ring, then clipped the darker
paper from AUTUMN BLISS to it. To add a little definition to the ring, you can
add some layer styles to it. (My preference: Size 20 px, Distance 15 px,
Opacity 50%, Color 555353 – med gray, Bevel up 15 px)
Example 1 - first ring

2. Duplicate the ring, reduce the
size, place the new layer under the original ring layer, and clip gold paper
from AUTUMN BLISS. Duplicate the original ring again, and this time increase
the size so that there are now two rings in gold surrounding the burgundy
original ring! Merge the two gold rings together. To add some definition to it
I added a bevel only to the gold ring. (My preference: Bevel up 15 px) I didn’t
shadow this layer, since I was planning to save the cluster as a *.png file,
and I didn’t want shadows in the transparent areas. The entire cluster can be
shadowed when you add the *.png to a layout!
Example 2 – double ring

3. To add a little definition to the
rings, you can add some layer styles to it. Burgundy ring (My preference: Size
20 px, Distance 15 px, Opacity 50%, Color 555353 – med gray, Bevel up 15 px)
Gold ring My preference: Bevel up 15 px) I didn’t shadow this layer, since I
was planning to save the cluster as a *.png file, and I didn’t want shadows in
the transparent areas. The entire cluster can be shadowed when you add the
*.png to a layout!
Example 3a – burgundy ring layer
style settings

Example 3b – gold ring layer style
settings

4. Now add your flowers and foliage.
My general work pattern is from the top layer down to the ring layers. I built
this cluster that way. In order to show the shadow process on the cluster, I
just had to hide all the layers and work my way back up. I want shadows where
one item crosses another, but not any shadows in the transparent areas. This
takes a little concentration on my part, but the process is easy. My process:
duplicate the layer. Place the lower of the duplicated layers just above the
layer where you want the shadow to fall. Shadow the duplicate and clip it to
the layer below. Shadows will remain only on the layer it crosses, and not in
the transparent area. Original layer will remain unshadowed. You might want to
add a little bevel only on the original layers (sometimes I do, depending on
the need for more definition) In the case of my leaf that was the layer just
above the rings, I had to do the process twice so that the shadow would fall on
both the burgundy and the gold ring!
Example 4a – layers palette showing
duplicated leaf just above the burgundy ring

Example 4b – layers palette showing
duplicated leaf just above the gold ring

Example 4 c – ring layers with
shadow of leaf added (at bottom)

5. Continue building your shadows
where layers cross other layers, building up until you reach the top layer of
the cluster. Some of the layers get very “complicated looking” (or messy,
whichever term you prefer) when all the shadows have been applied. Here’s a
screen shot of part of my layers palette after shadows have been applied.
Example 5

6. On my highest layer, I like to
make my shadow a little deeper. (My preference: Size 30 px, Distance 25 px,
Opacity 50% Color 555353 med gray Bevel up 2 px)
Example 6a – style settings for
highest layer in the cluster

Example 6b – completed *.png cluster
(This is a screen shot, 72 dpi *.jpg not the actual *.png file)

After
the tutorial was planned, and drafted, I just had to use my cluster on a layout
… so here is what I did with the cluster I made.

Hybrid Calendar - Putting your art to work for you!
This article was previously published on the Berry Sweet Scraps blog - written by me!
Hi! poki here with the first article
in a new series here on the Berry Sweet Scraps blog called “Monday Mojo” – we
hope to provide interesting tips, tricks, trends and tutorials to help inspire
and get your “mojo” going!
It will soon be gift giving time. I
have always love to make and give hand-made gifts … and my family and friends
have grown to expect them! And since I really want to have my photos and art
“work for me” I’ve been brainstorming ways to use what I’ve already done … just
“put it to work” for me!
What better way to make your layouts
and photos work for you than to use them to create handmade calendars! Your
family and friends will cherish them, I’m sure. I started making calendars
about 10 years ago when I was stumped for a gift for my neighbor, Geroge. You
know that kind of guy … if he needed it, or wanted it, he already HAD it! It
was getting close to Christmas, and I needed to do something quick, so I
selected my 12 favorite photos from my archive, printed them, mounted them on 4
x 12″ cardstock that I had pre-printed with the next year’s calendar (sheets
were 8 1/2 x 12″ cut down from 12 x 12″ scrapbooking cardstock, and printed
with two months on each page) I mounted the photos, decorated the pages, and
framed them in a 4 x 12″ stand up frame. He loved it, and took it to his Dental
Office! About October of the following year, he started hinting that he would
need a refill, because his staff and patients depended on my calendar sitting
there on the check out desk. And thus began my calendar making “business!” I’ve
made them for family, and friends, and I’ve even made a few to sell at craft
shows. I had to change the presentation when my supply of 4 x 12″ stand up
frames disappeared. I’ve done 5 x 7 plastic frames, and I found some CD cases
that would stand up, and they made a great presentation too!
The other day while driving to my
aerobics class on the west side of the county, I had one of those “duh”
moments. Why not design the pages in a 4 x 6″ canvas, so I could get them
printed quickly and easily at my favorite printer. That is so much easier than
home printing! My printer does a great job but the process is time consuming!
Printing, drying, cutting … much easier to just upload from the comfort of my
office, and go pick them up an hour later! Done! If definitely took longer in
the design process than the printing!
I am a nature/landscape photographer
– my archive is full of flowers, butterflies, and landscapes. So for the
purposes of this article I made a wildflower calendar from the wildflower
season this past Spring (it was a good one!) The calendar portion was also made
by me and will be given as a freebie at the end of this article.
Here’s what all of my Wildflower
pages look like, reduced to 50% of their size (2 x 3″) and inserted on a 12 x
12″ scrapbook canvas!

I designed the stand for this
project as a TECH class project for my customers. I was in direct sales for a
rubber stamp company for 4+ years, until the company went out of business last
August. My customers still want a class every month so I have continued to
provide them with a class project each month for a small supply fee. We did an
A2 size calendar in January 2012, with pre-printed calendars, and then stamped
images on it. That project provided the inspiration for the stand for my hybrid
calendar. Directions are posted farther down this post! Another option, if you don’t have the tools to make the stand,
would be to buy a 4 x 6″ plastic frame (portrait style, meaning 6″ tall, 4 ”
wide) and slide all of your photos into it! And then just trade them out each month!
Here’s a photo of my completed
calendar!

and now - your freebie:

Directions for completing the stand -
I designed the stand for this projects as a TECH Class
project for my customers in January 2012. We did an A2 size (4 1/4 x 5
1/2" - that's one quarter of a standard 8 1/2 x 11" sheet of paper)
calendar, preprinted with months by poki, and then stamped seasonal images, and
bound it to the stand. And they already told me we have to do it again in January 2013!
Because I still have so much paper from 12+ years of paper scrapbooking (and from working in 2 different scrapbook stores after I retired from teaching in 2003) I decided not to print digital paper for the stand, although it could be done. Sizes will be given in the directions:
SUPPLIES:
- two pieces of chipboard (light weight cardboard), cut to 4 x 6 1/2" (if you don't have a stash of chipboard, the cardboard from a cereal box or similar box would be perfect)
- one sheet of 12 x 12" patterned paper, cut 2 pieces 6 x 8 1/2" (or print your own to size)
- two sheets of cardstock, two pieces cut to 3 3/4 x 6 1/4" and one piece cut to 4 x 5"
TOOLS:
- Zutter bind-it-all (That's a machine that cuts the binding holes and attaches the binding ring)
- binding ring (1/2" size, with 6 prongs)
- adhesive of choice ( I use glue sticks for their convenience, just make sure to press to get a good bond)
DIRECTIONS:
1. Adhere chipboard piece in the center of the back of the patterned paper. Cut corners diagonally, leaving approximately 1/8" to cover the point (these cuts take out a lot of the bulk, and allows the paper to fold smoothly around the chipboard).

2. Fold and adhere paper around the edges of the chipboard. Repeat steps 1 & 2 for second piece of chipboard.

3. Score the 4 x 5" piece of cardstock at
1", 2 1/2" and 4" and fold into a "W" shape. (I use a
scoring tool called a Scor-Pal, but this can be done with a ruler and a bone
folder as well) This piece is adhered to the bottom edges of the two covered
chipboard pieces that you made in steps 1 & 2. When step 3 is complete you
should have one long piece with the cardstock folded up in the center.

4. Since the uncovered parts of the chipboard
will be permanently bound into a place where they won't be seen in the finished
project, you don't need to cover them, but I like my projects to look
"finished" so I cover the inside of with the remaining cardstock
pieces.

5. Adhere photo backs together (January to
December, February to November, etc) Double check to make sure all tops are on
the same side! When your photos are bound together, you will be setting up the
last half of the year as you flip the first half of the year. At the end of
June all you will need to do is turn your stand around and July will be ready!
6. I used my Zutter bind it all to bind my projects together with a 1/2" binding ring. There are several kinds of binders available on the scrapbook market now. If you don't own a binder, check with your paper scrapping friends. These machines are great tools to have - I use mine all the time. And it is well worth the investment that I made in it! I used the Zutter to cut binding holes in both sides of the chipboard frame at the same time. I also cut binding holes in the photographs, four months at at a time.
7. Stick all the calendar pages together in order (double check order), insert the binding ring through the calendar pages and into the stand, and close the ring with the Zutter machine! Almost like magic - a flip calendar that stands on its own!
Thursday, October 18, 2012
October has been a busy month ...
Jen C Designs has been busy during October as always. First release


I love the color palette in this one ...
Images are linked to Ginger Scraps store
Here's one of my layouts that I've done with Fall Festival - a trip with Blake to the Pumpkin Patch in 2009

I have also done several challenges at Gingerscraps with FALL FESTIVAL -
BUFFET CHALLENGE (FALL FESTIVAL was part of the GS BUFFET for October - so we had to use one of the Buffet kits) The template and wordart are made by me, ps scraps!
Photo - November 2010 at Lost Maples State Natural Area

TEMPLATE CHALLENGE Oct 1 - 15
Template designed by Blue Heart Scraps
kit - Jen C Designs FALL FESTIVAL
Photo 10-10-10 sunrise in Rogers AR

TEMPLATE CHALLENGE October 16 - 31
Kit - Jen C Designs FALL FESTIVAL
Template - Twin Mom Scraps for challenge
Photo: Monarchs in the neighborhood 10-15-2012

Jen does such a great job on templates, and her
is no exception to the rule!
I've used one of the templates from the Jumbo Photo 2 (bottom left in preview) along with Jen C Designs
to create a layout with this photo I took on Bolivar Peninsula at sunset 9-22-2012 (Mike's birthday trip to Galveston)

I also worked with one of the Blends 4 (bottom right in preview) along with
Jen C Designs/Trixie Scraps
to create this layout of photos of the Grand Teton in Wyoming, 6-19-2012. Such a gorgeous view!

I used the same BLENDS 4 template along with Sweet Digi Scraps
to create this sunset layout from Galvestion Island 9/22/2011 (Mike's birthday trip last year)

Next up on Jen's agenda was
FURRY FRIENDS
at Gotta Pixel
Images are linked
I had to honor Miss Fleabag IV (Mike's kitty in heaven) with this layout - this layout features one of the TALK BACK templates from the OCTOBER TEMPLATE GRAB BAG

Stay tuned ... more to come ... tomorrow!
Subscribe to:
Posts (Atom)